 บัญชีของฉัน
 The QuickBooks error H505 indicates issues while accessing company files in the multi-user settings. The error suggests something blocking the multi-user connection to the server, pushing users for immediate and effective resolution. In this article, let’s investigate this commonly found H-series QB error in detail.
QuickBooks Multi-User Mode is among the various QB features, where multiple users can work on the same company file from different workstations in a network. Accessing the company file in a multi-user environment is as simple as accessing the file on your computer. However, the problem arises when QuickBooks, for some reason, cannot access the company file and gives the QuickBooks error code H505.
If you also get a QuickBooks error message with Error code H505, follow the complete article for detailed troubleshooting instructions.
QuickBooks error H505 can trouble users immensely by popping up unexpectedly and interrupting operations. If you’re frustrated and looking for a professional resolution to the issue, dial the Support Number 1.855.738.2784. Our QB expert team offers immediate assistance to fix the problem.

What Does QuickBooks Error Code H505 Mean?
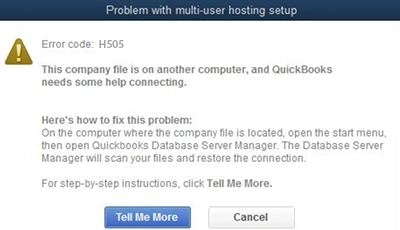
QuickBooks Error Code H505 is displayed when QuickBooks on the user’s computer cannot connect with the other computer in the network hosting the company file. This error indicates that there are technical glitches in the network setup that are interrupting the connection between different workstations in the network.
Reasons that Trigger QuickBooks Error Message H505
The following reasons are responsible for triggering QuickBooks error Message H505:
- Incorrect hosting configuration settings can trigger QuickBooks error H505.
- Your firewall may be preventing incoming or outgoing communication with the company file.
- The .nd file is either damaged or configured incorrectly, triggering QuickBooks error H505.
- QuickBooks may be unable to retrieve the IP address of the system or server hosting the company file, causing error H505.
- Workstations might be set up to access the file through the host’s Fully Qualified Domain Name (e.g., computername.domain.com).
- The QuickBooksDBXX service might not be activated, causing QB error H505.
- The file may be on a server that is not native-installed, such as a Virtual Machine (VMWare, VirtualBox, Microsoft Virtual Server, etc.).
- QBDataServiceuserXX might be lacking proper Read/Write permissions and hasn’t been set to “Include Inheritable permissions from the object’s parent.”
- Failure to scan the QuickBooks files folder using the QuickBooks Database Server on the server may cause QuickBooks error H505.
Solutions to Fix QuickBooks Error H505
Now, let’s move to the solutions for QB error code H505:
Solution 1: Ensure a Proper Hosting Set up on Server and Workstations
Ensure that the “Host Multi-User Access” option is turned off on your workstations. Workstations should not host your company files; this should be done only on the server computer.
Note that you can perform these steps before opening a company file.
On any workstation displaying H101, H303, or H505 errors:
- Open QuickBooks.
- Avoid opening your company file.
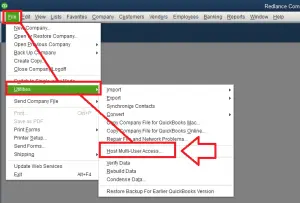
- Instead, click on “File” and then choose “Utilities.”
- If you get the “Host Multi-User Access” option, do not select it. Move to the next workstation, as this is not causing the issue.
- If you witness the option “Stop Hosting Multi-User Access,” select it.
- Replicate these steps on all workstations where you encounter Error H101, H303, or H505.
After checking your workstations, move to your server computer, which is the usual host of your company files:
- Open QuickBooks on your server computer.
- Select “File,” and then choose “Utilities.”
- If you see the button “Host Multi-User Access,” select it. Do not select “Stop Hosting Multi-User Access” if it is available.
Solution 2: Test your Network Connectivity
Run a ping test on your server computer to ensure a proper connection between the server and workstation computers. Test the IP address connection as follows:
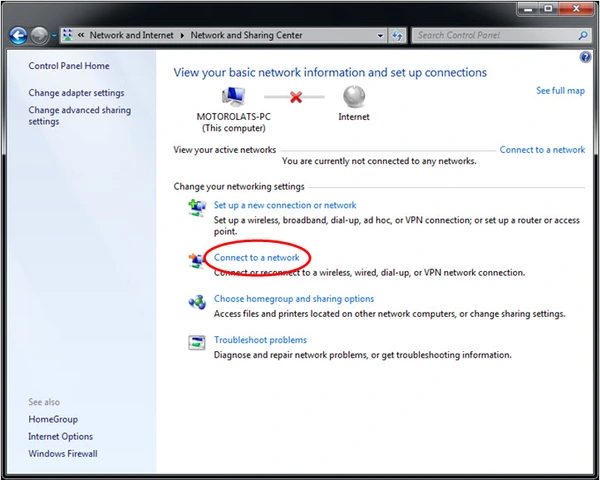
- Go to the Control Panel and select Network and Sharing Center.
- Click the Change Advanced Sharing Settings option and ensure the Turn on Network Discovery option is selected under the Network Discovery and File and Printer sharing area.
- Press Windows + R to get the Run program up on the screen.
- Type CMD and press Enter or click OK to run the Command Prompt program.
- Once you see a black and white screen on your screen, type the ipconfig/all command and run it by pressing the Enter key.
- Take a note of the server name and close the command prompt window.
- Now, open the same command prompt program on the workstation computer and run the ping(your server name) command without the brackets.
- This command will send some data packets to the server and if your server receives all, you will notice no packet loss and this indicates there are no issues in the connection between the server and the workstation.
- Follow the same steps on each workstation that is giving you the error code H505.
- If some workstations can’t receive all the packets sent to the server, contact your IT team for further troubleshooting assistance.
Solution 3: Use the Database Server Manager on the Host Computer
You may need to analyze your network issues with the network diagnostic tool on the host computer. So, here’s how you can download and install the tool:
- Download QuickBooks Tool Hub from Intuit.
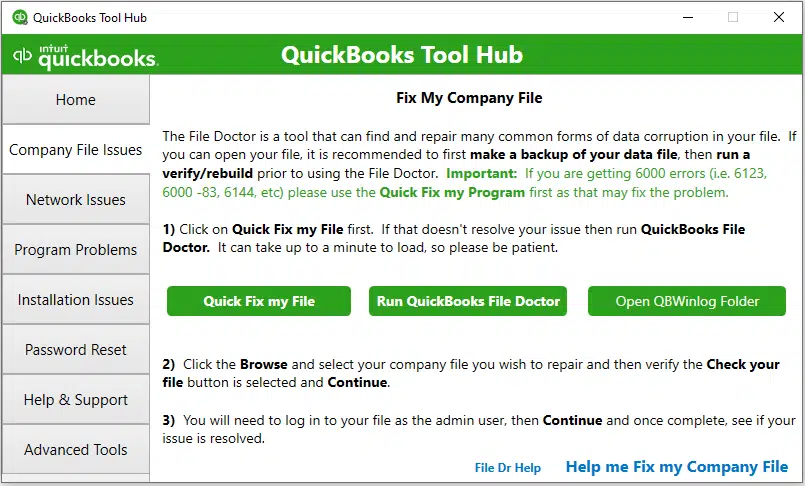
- Finish installing the QuickBooksToolHub.exe file on your device.
- Set up QuickBooks Tool Hub.
- Open it.
- Move to Network Issues.
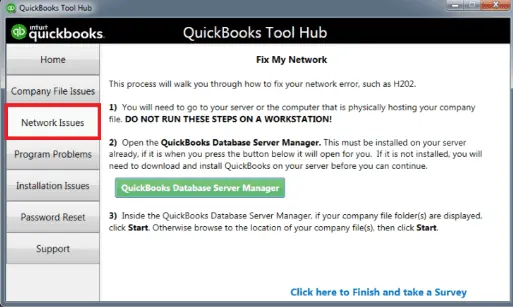
- Click the QuickBooks Database Server Manager.
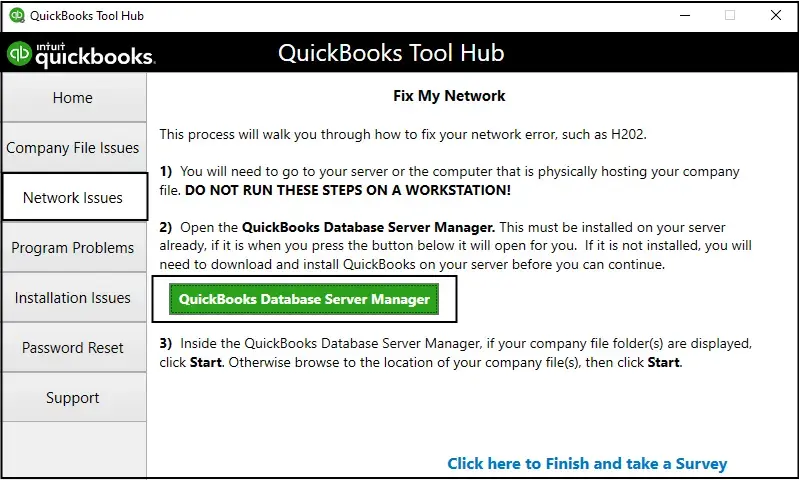
- Start scanning and verify the results of the tool.
Solution 4: Ensure QuickBooks Network Ports are Open
Firewall blockages may interrupt QuickBooks communication between server and workstations. So, open your network ports as follows:
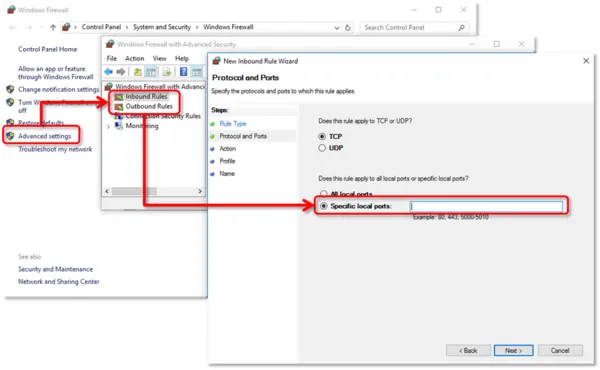
- Open the Windows Start menu.
- Type “Windows Firewall” in search and open Windows Firewall.
- Select “Advanced Settings.”
- Right-click “Inbound Rules” and choose “New Rule.”
- Select “Port” and click “Next.”
- Ensure that “TCP” is selected.
- Reach the “Specific local ports” field.
- Enter the specific ports based on your QuickBooks version:
- QuickBooks Desktop 2020 and later: 8019, XXXXX
- QuickBooks Desktop 2019: 8019, XXXXX
- QuickBooks Desktop 2018: 8019, 56728, 55378-55382
- QuickBooks Desktop 2017: 8019, 56727, 55373-55377
(Note: For QuickBooks Desktop 2019, 2020, and future versions, the ports are dynamic, not a range, and are assigned during installation.)
- Click “Next” after entering the port number.
- Choose “Allow the Connection” and click “Next.”
- Ensure all profiles are marked if elicited, and click “Next.”
- Create a rule with a name like “QBPorts(year).”
- Click “Finish.”
To configure outbound rules, repeat the same steps but select “Outbound Rules” in step 4.
To create exceptions for the listed executable files in Windows Firewall, follow these steps:
- Go to the Windows Start menu.
- Input “Windows Firewall” in the search.
- Open Windows Firewall.
- Select “Advanced Settings.”
- Right-click “Inbound Rules” (later, you’ll create Outbound Rules) and choose “New Rule.”
- Select “Program” and click “Next.”
- Choose “This Program Path” and then click “Browse.”
- Find and pick one of the executable files from the list below, and click “Next.”
- Select “Allow the Connection” and click “Next.”
- If prompted, make sure all profiles are selected, and click “Next.”
- Create a rule and name it “QBFirewallException(name.exe).”
- To create outbound rules, repeat the same steps, but select “Outbound Rules” in step 4.
Executable Files and Locations:
- AutoBackupExe.exe: C:\Program Files\Intuit\QUICKBOOKS YEAR
- Dbmlsync.exe: C:\Program Files\Intuit\QUICKBOOKS YEAR
- DBManagerExe.exe: C:\Program Files\Intuit\QUICKBOOKS YEAR
- FileManagement.exe: C:\Program Files\Intuit\QUICKBOOKS YEAR
- FileMovementExe.exe: C:\Program Files\Intuit\QUICKBOOKS YEAR
- QuickBooksMessaging.exe: C:\Program Files\Intuit\QUICKBOOKS YEAR
- QBW32.exe: C:\Program Files\Intuit\QUICKBOOKS YEAR
- QBDBMgrN.exe: C:\Program Files\Intuit\QUICKBOOKS YEAR
- QBServerUtilityMgr.exe: C:\Program Files\Common Files\Intuit\QuickBooks
- QBCFMonitorService.exe: C:\Program Files\Common Files\Intuit\QuickBooks
- QBLaunch.exe: C:\Program Files\Common Files\Intuit\QuickBooks
- QBUpdate.exe: C:\Program Files\Common Files\Intuit\QuickBooks\QBUpdate
- IntuitSyncManager.exe: C:\Program Files\Common Files\Intuit\Sync
- OnlineBackup.exe: C:\Program Files\QuickBooks Online Backup
Follow these steps to generate exceptions for each executable file to ensure that QuickBooks functions properly with Windows Firewall.
Solution 5: Provide Access Permissions to QB Services
You should ensure the folders have adequate permissions to prevent unauthorized access to your QuickBooks data. The steps involved in setting up folder permissions in QuickBooks to rectify the QuickBooks H505 error message are as follows:
- Open the folder that holds your QuickBooks company file. Do so by heading to the File menu and opting for File Explorer.
- Right-click the folder with the company file and select Properties.
- Click the Security tab, followed by Advanced.
- Here, opt for QBDataServiceUserXX. Arrange the following settings as Allowed:
- Create Folders/Append Data
- Read Attributes
- Traverse Folder/Execute File
- Read Permissions
- Read Extended Attributes
- Create Files/Write Data
- Write Attributes
- List Folder/Read Data
- Write Extended Attributes
- Further, head to Properties > Security Tab > Edit QBDataServiceUserXX.
- Click Add and type in the name of the user or group you want to give access to the folder.
- Pick Check Names to verify that the user or group name is correct.
- Once you have added the user or group, choose the user or group from the list.
- In the Permissions for Users or Groups section, opt for the permissions you want to grant to the user or group. For example, select Full Control if you want to give the user or group full access to the folder.
- Click Apply and then tap OK to save the changes.
Adjust folder permissions for QB H505 error as follows:
- Tap the Start menu and opt for File Explorer.
- You must locate and right-click the following folders to alter the permissions:
- C:\Program Data\Intuit\Entitlement Client\v8
- C:\Program Data\Intuit\Entitlement Client
- C:\Program Data\Intuit\Entitlement Client\v6.0
- C:\Users\Public\Public Documents\Intuit\QuickBooks\Sample Company Files\QuickBooks Enterprise Solutions X.0 (X = version) or C:\Users\Public\Public Documents\Intuit\QuickBooks\Sample Company Files\QuickBooks 20XX (XX = year)
- C:\Program Data\Intuit\Entitlement Client\v3
- C:\Program Data\Intuit\QuickBooks Enterprise Solutions X.0 (X = version) or C:\Program Data\Intuit\QuickBooks 20XX (XX = year)
- C:\Program Data\COMMON FILES\INTUIT
- C:\Program Data\Intuit\Entitlement Client\v5
- C:\Program Data\COMMON FILES\INTUIT\QUICKBOOKS
- C:\Users\Public\Public Documents\Intuit\QuickBooks\FAMXX (XX = year)
- C:\Users\Public\Public Documents\Intuit\QuickBooks\Company Files
Depending on your QB version, you may or may not have all these files and folders. Now, undertake the following actions to resolve error code H505 QuickBooks 2022:
- Right-click these folders and select Properties.
- Choose Everyone on the Security Tab (If Everyone is not available as an option, click Add and type Everyone > OK.)
- Opt for Full Control, followed by Apply and OK.
Also, verify the following services on your server for QB error H505:
- Begin by going to the Start menu on the server system and typing in Run to open the Run tab. Alternatively, you can press Windows + R keys for Windows 8 and above.
- Here, you need to type services.msc and press Enter.
- Look for QuickBooksDBXX in the list, then with XX representing the QuickBooks version.
- Double-click QuickBooksDBXX and move to the automatic tab to locate the Startup type section.
- The service status should be either Running or Started, and if it’s not, select the Start tab.
- Follow up by choosing the Recovery tab and restart the service from each of the following drop-down menus:
- First failure
- Second failure
- Subsequent failure
- Click Apply > OK to save all the changes.
- Repeat all the steps for QBCFMonitorservice.
Solution 6: Edit Windows Hosts File to Add your Server
Before proceeding with this solution to rectify error code H505 QuickBooks 2023, keep the following considerations in mind:
- Do not undertake this method if you aren’t technically sound or uncomfortable. Let IT and Microsoft experts handle it.
- These steps work well for computers with static IP addresses. The systems with dynamic IP addresses may face issues after restarting.
Now, let’s jump into the steps for this method of resolving QuickBooks error H505 on server:
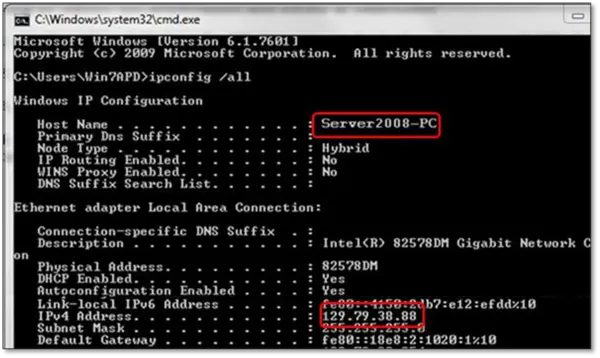
Step 1: Know your computer’s name and IP address
Grab a pen and paper in hand for this resolution. Also, access your server computer and workstations with admin rights. First, follow the steps on your server computer for QB error h505, then follow with the workstation.
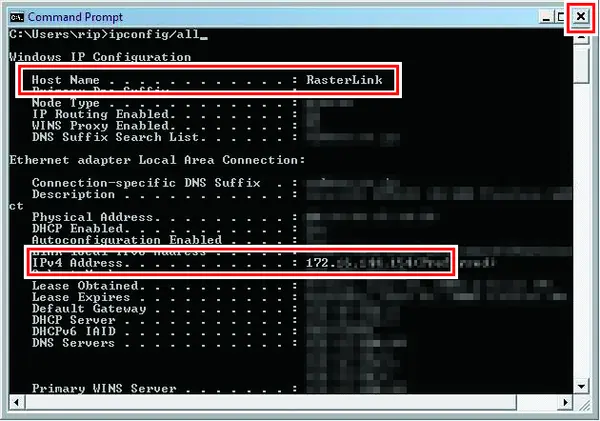
- Launch the Run dialog box on the server computer by pressing the Windows + R keys.
- Press Enter after entering cmd in the Run window.
- Type “ipconfig /all” and ensure space after ipconfig. Then, hit Enter.
- Note your hostname and IP address or IPv4.
- Repeat the above steps for your workstations.
Step 2: Edit the Windows Hosts File
Follow these steps for the resolution of QuickBooks error H505:
- Exit QuickBooks and head to the Windows Start menu on the server computer.
- Click Computer and head to either of the following:
- C:\Windows\System32\Drivers\Etc
- C:\Windows\Syswow64\Drivers\Etc
- Double-click the Host file and open Notepad.
- Type IP addresses and the computer name corresponding to them. Use the Tab key on the keyboard for space.
- In the server computer, you should enter the workstation’s IP address and computer name.
- In the workstation system, put the server computer’s IP and computer name.
Step 3: Save the Changes to the Host File
Finally, the last step in resolving error code h505 QuickBooks 2021 is saving the changes to the host file:
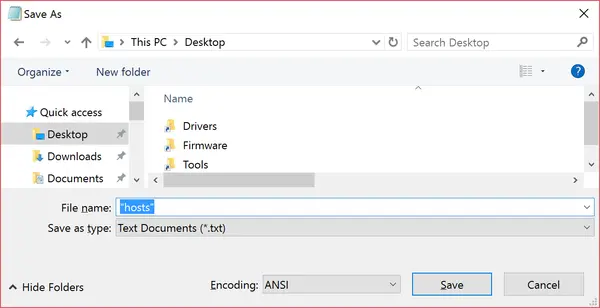
- Head to the File menu in the Notepad and select the Save option.
- Under the File name field, then enter “hosts” with quotation marks.
- Click Desktop, followed by Save.
- Locate the file you saved just now, right-click, and hit Copy.
- Click Browse to head to the file location used in Step 2, which is either:
- C:\Windows\System32\Drivers\Etc
- C:\Windows\Syswow64\Drivers\Etc
- Look for the host file, right-click, and tap the Rename option.
- Change the name of the host file to host.old, and click Continue.
- Hold the Ctrl + V keys on the keyboard and click Continue.
Hopefully, these steps will rectify the H505 error QuickBooks on your computer.
Wrapping Up
As the QuickBooks Error H505 occurs because of network issues, there are possibilities that you can again get the same error or the error might not get resolved even after following all the troubleshooting steps. In such conditions, we suggest users call our QuickBooks Desktop Error Support 1.855.738.2784 for help and better support.
FAQ’s
Yes, you must consider the following before initiating any solution:
1. Maintain a backup of the company files.
2. Ensure the latest version of QuickBooks is installed.
3. Use QuickBooks Tool Hub to run the Quick Fix My Program Tool.
4. Configure firewall settings to eliminate obstructions.
5. Initiate QuickBooks Database Server Manager.
6. Log in to your QB program with admin details.
7. Do not forget to download the latest payroll and tax table updates.
8. The multi-user mode won’t work if you don’t install QuickBooks on the server. So, ensure the appropriate installation of the application.
Usually, Windows XP, Vista, 7, and 8 get infected by this error. Therefore, seeking professional assistance or knowing the troubleshooting solutions is critical to resolving them at the earliest. Although your Windows performance slows down and frequent crashes become a common occurrence, trying the solutions in our blog will help you fix the problems.
If you wish to know whether the error H505 in QuickBooks has infected your system, look for these signs:
1. You will start facing issues enabling Multi-User mode.
2. If you have opened a file or report in QuickBooks, it might close unexpectedly.
3. You might also notice your system frequently crashing.
4. An unresponsive Windows operating system is also a symptom of QuickBooks error H505.
5. You will likely not be able to access the company data from the server.
6. One most common symptom is the appearance of QuickBooks error code H505 on your screen.
7. QuickBooks and other active programs in the background may also suffer from unresponsiveness, delays, and sluggishness.
8. The mouse and keyboard-like peripherals do not receive commands timely.
Yes, you can utilize the QB File Doctor Tool to configure the network and file issues as follows:
1. Ensure that QuickBooks Tool Hub is installed on your server computer with access to the network.
2. After confirmation, install QuickBooks Tool Hub and run QuickBooks File Doctor Tool from it to get rid of all the bugs and glitches.
3. Click the Check your file and network option to proceed.
4. Hit Continue.
5. Assess the File Doctor results.
If the Utilities option in the File menu seems grey while checking the accuracy of hosting settings, you should consider updating your QuickBooks application. Updating the QuickBooks application usually fixes minor bugs and glitches and presents the users with an upgraded version. Therefore, execute this solution by undertaking the following process:
1. Open QuickBooks Desktop, and from under the Help tab, select About QuickBooks.
2. From the Update QuickBooks window, click the Update Now button.
3. Make sure to check-mark the New Features, Maintenance Releases, and Reset Updates checkbox.
4. Click the Get Update button.
5. Restart QuickBooks and if prompted to install updates, then click Install Now.
6. Once the updates are installed, restart your computer, and try to open the company file again.