 บัญชีของฉัน
You can import and export various list and transaction types to and from QuickBooks Desktop using different file formats.
Import Excel files
You can import Customer, Vendor, Items, and Chart of Accounts from an Excel spreadsheet. There are several options available when importing Excel files from QuickBooks.
Option 2: Advanced import
For items
Follow the steps below if you are importing items and you do not have an Excel or CSV file yet.
|
Reminders:
|
Step 1: Turn on inventory preferences
- Sign in to your company file as Admin.
- Make sure you are on the Single-user mode.Note: On the File menu, an option to Switch to Multi-user Mode should be available. If not, select Switch to Single-user Mode.
- From the QuickBooks Edit menu, select Preferences.
- Select Items & Inventory on the left pane, then go to the Company Preferences tab.
- Select the Inventory and Purchase Orders are Active checkbox, then select OK.
Step 2: Set up accounts in your data file
- From the Lists menu, select Chart of Accounts.
- Right-click anywhere in the Chart of Accounts then select New.
- Select Account Type. For this step, you need to create the following account types:
- Income Account to track sales.
- Cost Of Goods Sold (COGS) Account.*
- Inventory Asset Account.*
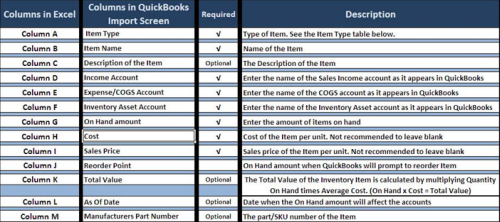
Step 3: Create your data with the following for each item:
- Item Name: Name you want on your item list.
- If you are importing Sub-Items, the Parent item must either already exist in the Item List or be above the Sub-item, in the list order, on the spreadsheet you are importing.
- If you are importing Sub-Items, the Item Name would be formatted with the Parent separated from the Sub-Item by a colon.
Example:WidgetsWidgets:Widget001Widgets:Widget002Widgets:Widget003
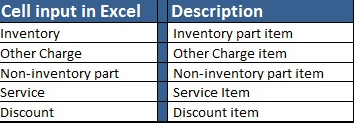
- Item Type: Include the type of item, i.e. inventory part, service, etc. Item name must be spelled out just as you see it in QuickBooks.
- Description of the Item: Written description of the item that will appear in the Item List, Sales Orders, Sales Receipts, and Invoices.
- Income Account: Name of the Income Account in which sales of the item will be recorded.
- Inventory Asset Account: Name of the Asset Account in which the inventory value will be recorded.
- Name of the COGS Account: Name of the COGS Account in which purchases of the item will be recorded.
- On Hand Quantity: The Quantity On Hand of the Item (Inventory Items only).
- Cost of Item: The Cost of the Item.
- Sales Price: Sales Price of the Item.
- Total Value: The Total Value of the Item (New Inventory Items only).
- As Of Date: When the Item was last purchased (New Inventory Items only).
- Is Passed Thru: Be sure that you put a Y in this column so you can track both the cost and price of the item.
IMPORTANT: You must use the same name, spelling, and capitalization as it appears in the Chart of Accounts.
Optional Information:
- Manufacturers Part Number or SKU: You can also import the part/SKU number of an item.
- Reorder Point: Once the Item On Hand count reaches this amount, QuickBooks will prompt you to reorder more Items.
Step 4: Create the spreadsheet
Create the spreadsheet using these tables as guides:
![]()
Step 5: Prepare to import
Make sure you know the location of the Excel spreadsheet file. QuickBooks will sync with the spreadsheet during the process.
- Start QuickBooks.
- Open your company data file.
- Back up the QuickBooks company file without overwriting any previous backup.
Step 6: Import the spreadsheet
- Go to the File menu, select Utilities then Import and then Excel Files.
- On the Add/Edit Multiple List Entries, select No.
- Select Advanced Import.
- Setup a mapping.
- Select Browse and choose the Excel file.
- Choose the correct sheet in the Excel workbook.
- Select the This data file has header rows checkbox to identify the available headers from your file.
- On the Choose a mapping dropdown, select Add New.
- On the Mappings window:
- On the mapping name field, type a name to easily identify the mapping (Customer, Vendors, etc…).
- From the Import type dropdown, choose the data you are importing.
- Match the QuickBooks and Import Data columns, then select Save.Note: QuickBooks column displays the available customer fields in QuickBooks and Import Data column displays the available row headers on your Excel file. If you don’t have data from your file that will match the fields in QuickBooks, leave it blank.
- Select Preview to verify the mapping.
- Select Import to complete the import.
- If you receive the Duplicate Record Found error, you will be presented with these options:
- Keep the existing data and discard the import data.
- Replace the existing data with import data, ignoring blank fields.
- Replace the existing data with import data, including blank fields.
To fix the errors:
- Choose the appropriate option.
- Select Apply or Apply to all.
- You will receive a notification indicating the number of successful imports and the number of errors. If you have errors, select Save for the error log and review it to determine the necessary action to resolve the errors.
- Re-import list as needed.
For customers, vendors, and other lists data
Use this option if you are importing Customers, Vendors, Items and other lists data and you have an Excel file or CSV data already formatted for QuickBooks.
- From the File menu, select Utilities then Import and then Excel Files.
- On the Add/Edit Multiple List Entries, select No.
- Select Advanced Import.
- Set up a mapping.
- Select Browse and choose the Excel file.
- Choose the correct sheet in the Excel workbook.
- Select the This data file has header rows checkbox to identify the available headers from your file.
- On the Choose a mapping dropdown, select Add New.
- On the Mappings window:
- On the mapping name field, type a name to easily identify the mapping (Customer, Vendors, etc…)
- From the Import type dropdown, choose the data you are importing.
- Match the QuickBooks and Import Data columns, then select Save.Note: QuickBooks column displays the available customer fields in QuickBooks and Import Data column displays the available row headers on your Excel file. If you don’t have data from your file that will match the fields in QuickBooks, leave it blank.
- Select Preview to verify the mapping.
- Select Import to complete the import.
- If you receive the Duplicate Record Found error, you will be presented with these options:
- Keep existing data and discard import data.
- Replace existing data with import data, ignoring blank fields.
- Replace existing data with import data, including blank fields.
To fix the errors:
- Choose the appropriate option.
- Select Apply or Apply to all.
- You will receive a notification indicating the number of successful imports and the number of errors. If you have errors, select Save for the error log and review it to determine the necessary action to resolve the errors.
- Re-import list as needed.
Option 3: Add/Edit Multiple Lists
Export Excel files
You can export Customer, Vendor, Payroll lists and transactions, as well as Items list into an Excel spreadsheet. If you need to change a report’s appearance or contents in ways that are not available in QuickBooks, you can also export reports and customize it in Excel without affecting your QuickBooks data.