Get started with tracking your fixed assets! Learn how to accomplish different key tasks in Fixed Asset Manager (FAM).
Assign an account to multiple assets
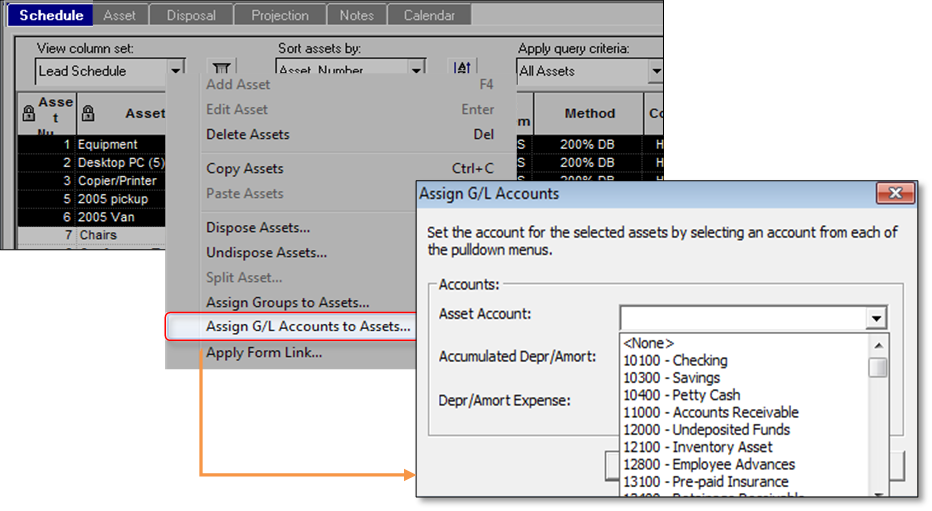
Converting asset data from one version of QuickBooks Desktop to another, or importing assets into FAM, may leave some General Ledger accounts (G/L accounts). These need to be manually assigned in FAM.
- Open Fixed Asset Manager.
- In the Schedule tab, highlight all the assets that need to be assigned to a specific account.
- Right-click the selected assets and choose Assign G/L Accounts to Assets.
- Select the account, then OK.
Change or add depreciation method/setting
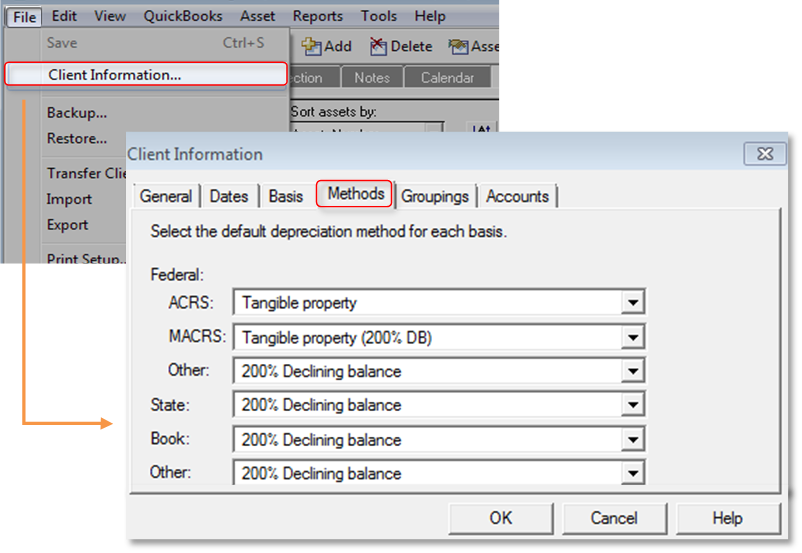
You may need to change or add the Depreciation Method for a fixed asset in order for FAM to calculate the current and prior depreciation correctly.
- Open Fixed Asset Manager.
- From the File menu, select Client Information.
- In the Methods tab, select the appropriate depreciation method for the depreciation basis.
- Select OK to save the changes.
Depreciate an old asset
Your business might already have some fixed assets even before you decided to use FAM. Follow these steps to record your fixed assets with correct depreciation.
In QuickBooks Desktop
- From the List menu, choose Fixed Asset Item List.
- Select Item, then New.
- Enter the necessary information, then select OK to close the New Item window.
In Fixed Asset Manager
|
IMPORTANT
|
- Select OK when the Asset Synchronization Log window opens.
- In the Schedule tab, double-click the asset you created.
- On the Federal column, scroll down to the Prior depreciation row, then select the amount displayed.
- Make the appropriate changes by adjusting the AMT, ACE, Book, State, and Other columns.
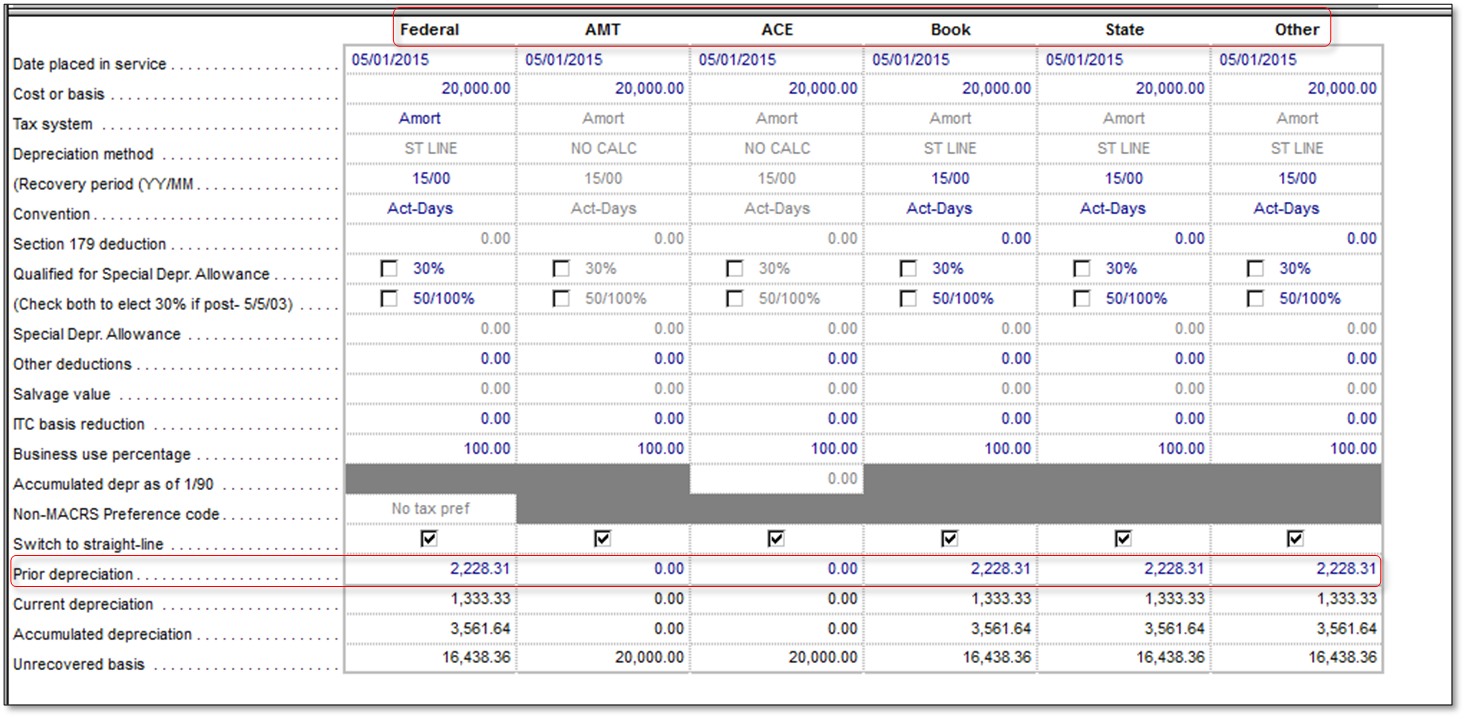
- Select Save.
Export QuickBooks Fixed Asset Items into ProSeries Form 4562
|
IMPORTANT: QuickBooks Fixed Asset Manager can only export data to the same year of ProSeries. This is because QuickBooks Desktop is based on Calendar year while Fixed Asset Manager and ProSeries are based on Tax year. This means that a QuickBooks Desktop 2017 comes with FAM 2016 which can export to Proseries 2016. |
- In ProSeries, create the file with the form that is the same as the form in QuickBooks Desktop.
- In QuickBooks Desktop:
- Create FAM asset(s).
- From the Lists menu, select Fixed Asset Item List.
- Select Item, then New.
- Enter the Fixed Asset(s) information, then select OK.
- Import QuickBooks FAM information into Fixed Asset modules.
- From the Accountant menu, select Manage Fixed Asset.
QuickBooks Desktop Enterprise: Company > Manage Fixed Asset - Select Create a New Fixed Asset Manager client, then OK and Next twice.
- Enter the date, then select Next.
- Select the Applicable Basis, then Next.
- Select the Default Depreciation Method for Each Basis, then Next.
- Select a method of how you want the fixed asset items brought in Fixed Assets Module from QuickBooks Desktop, then Next.
- Select the type of assets to save to the Fixed Asset Item List in QuickBooks, then Next.
- Select Finish, then OK in the Asset Synchronization Log window.
- From the Accountant menu, select Manage Fixed Asset.
- Create FAM asset(s).
- In Fixed Asset Manager:
- From the File menu, select Export > ProSeries Tax > Export.
- Choose the file from the Export ProSeries Tax Client File list.
- Select the client file, then Export.
- Select OK. You should get the message The export has been completed successfully.
- In ProSeries:
- The import should show Completed when you open the client file.
- All assets from QuickBooks Desktop should display in the asset list of ProSeries Form 4562 Depreciation and Amortization Schedule and Asset Entry Worksheets.
Import Fixed Assets from Excel into the Fixed Asset Manager
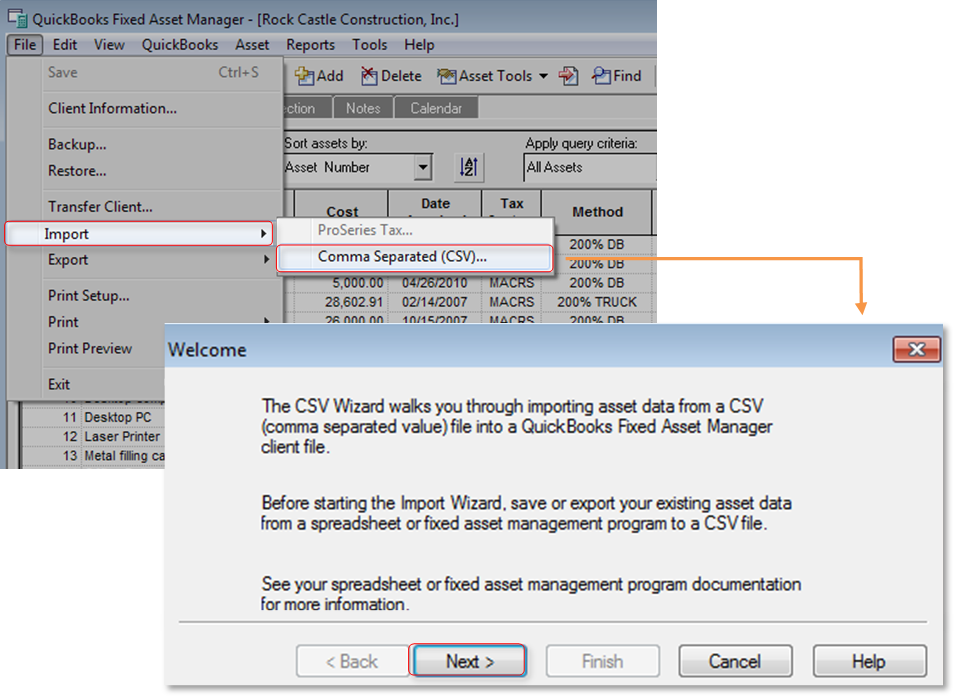
You can transfer information from third-party application to FAM as long as they can export data as Comma Separated Value (.CSV) file.
- Open Fixed Asset Manager.
- From the File menu, select Import.
- Select Comma Separated (CSV) to start the Import Wizard.
- Follow the prompts to complete the import.
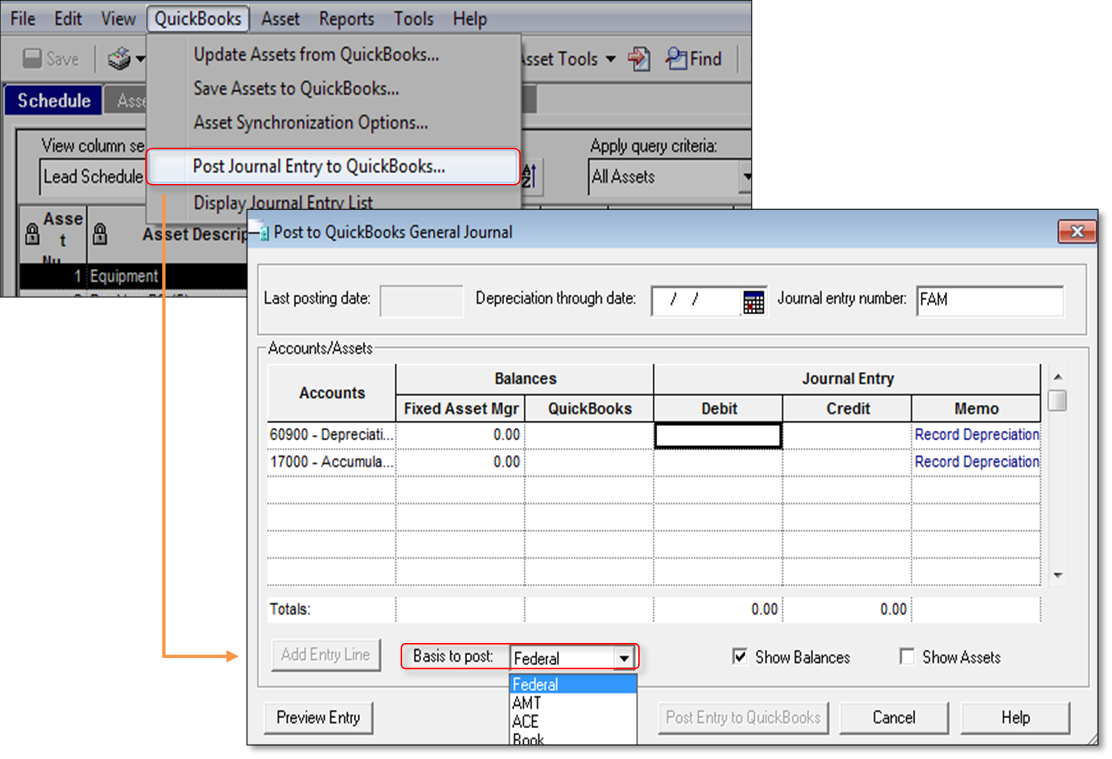
Select the basis on which to post a journal entry
In Fixed Asset Manager, it is possible to change the basis (Federal, Book, AMT, ACE, State, Other) you are posting journal entries on.
- Open Fixed Asset Manager.
- From the QuickBooks menu, select Post Journal Entry to QuickBooks.
- At the bottom of the window, select the desired posting basis from the Basis to post drop-down menu.
- Post the journal entry as usual.
For more information about this feature, see Managing fixed assets using FAM.

 บัญชีของฉัน