Learn how to set up Fixed Asset Manager to work with your QuickBooks company file.
Since QuickBooks Desktop and QuickBooks Fixed Asset Manager have different data files, it is important that you know how to set up Fixed Asset Manager (FAM) to ensure that your fixed asset financial information is properly handled. See Manage fixed assets using Fixed Asset Manager (FAM) for an overview.
If you need to install the new QuickBooks while using Fixed asset manager
- Install the new QuickBooks for Desktop.
- Open Fixed data manager in the new QuickBooks.
- Select Transfer client and follow the on-screen prompts.
Learn what to do if you skipped a version of QuickBooks, such as going from QuickBooks Desktop 2018 directly to 2020.
Follow these steps to start using the QuickBooks Desktop Fixed Asset Manager (FAM):
Step 1. Set up the Income Tax Form
Step 2. Set up General Ledger (G/L) Account in QuickBooks Desktop
Step 3. FAM Client Wizard
Step 4. Add Asset in Fixed Asset Manager
Step 5. Asset Synchronization
Step 1. Set up the Income Tax Form
Setting up your income tax form is important and necessary in order for FAM to track asset depreciation in an appropriate tax line.
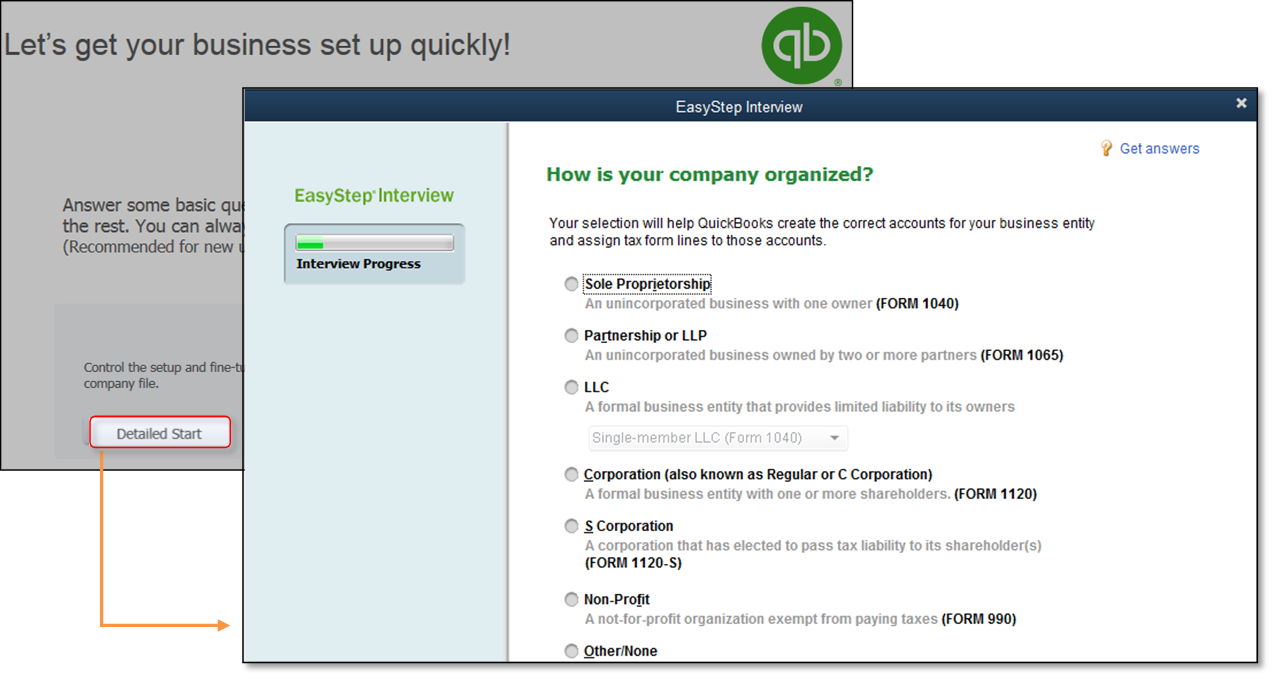
If you are just starting to create your QuickBooks Desktop company file:
- From the No Company Open window > Create a new company > Detailed Start.
- On the Easy Step Interview, How is your company organized? window, select your income tax form.
- Finish creating you company file.
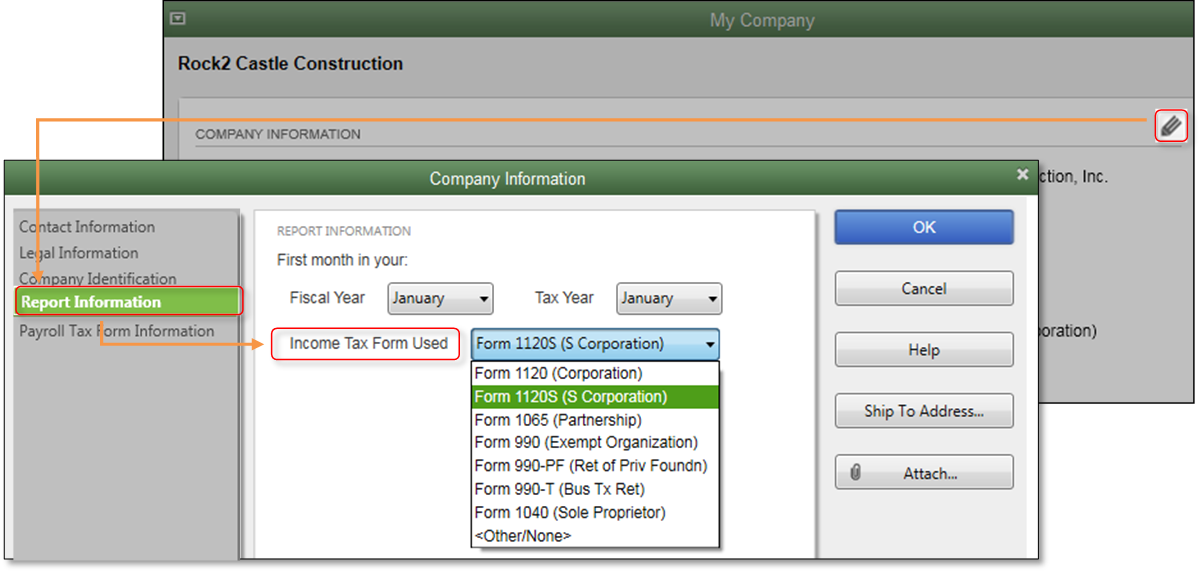
If you already have an existing QuickBooks Desktop data file:
- From the Company menu > My Company.
- Select the Pencil Icon and choose Report Information.
- Choose the income tax form for your business and select OK.
Step 2. Set up General Ledger (G/L) Account in QuickBooks Desktop
Depending on your preference, you can either track your assets using the Minimal account setup, where a limited number of accounts is used or the Ideal account setup where individual accounts are set up per fixed asset.
In addition to the asset account, FAM posts depreciation to the Depreciation (Expense) account and another entry to offset the Accumulated Depreciation account. It is necessary to have a specific General Journal (G/L) account created prior to using FAM for the first time.
Minimal Account Setup
| ACCOUNT NAME | TYPE |
| Fixed Asset Account | Fixed Asset |
| Accumulated Depreciation Account | Fixed Asset |
| Depreciation Expense Account | Expense |
Ideal Account Setup in Chart of Accounts (CoA)
- Create a Fixed Asset account for each asset (or group of assets) that you want to depreciate. Example: Create a fixed asset account called Vehicle, Computer or Furniture.
- Go to the Chart of Accounts.
- Right-click anywhere, then select New.
- Choose Fixed Asset, then complete the information required.
- Select Save & Close.
- Add two subaccounts to each Fixed Asset account you created. One account will track the cost of the asset and the other account will track the accumulated depreciation. By doing it this way, you will be able to tell the book value and accumulated depreciation of your asset at first glance.
- Go to the Chart of Accounts.
- Right-click anywhere then select New.
- Choose Fixed Asset, then mark Subaccount of. Choose the appropriate parent account.
- Complete the information required.
- Select Save & Close.
- Create an expense account named Depreciation Expense that will track your depreciation expense.
- Go to the Chart of Accounts.
- Right-click anywhere, then select New.
- Choose Expense then complete the information required.
- Select Save & Close.
Step 3. FAM Client Wizard
To open FAM, from the Accountant menu, select Manage Fixed Asset then choose the option appropriate to your business.
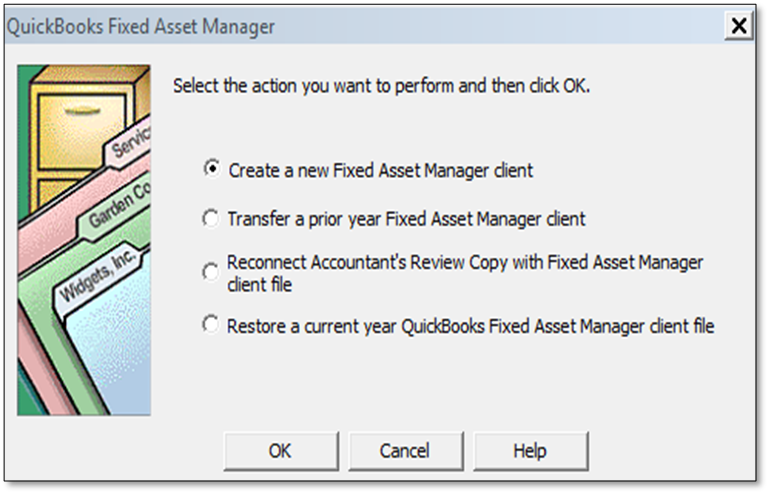
- Create a new Fixed Asset Manager Client: This choice is best for first time users.
- Transfer a prior year Fixed Asset Manager client: This is available for returning users wanting to bring last year’s assets into this year’s FAM.
- Reconnect Accountant’s Review Copy with Fixed Asset Manager: This option allows current year assets to be brought into the company file.
- Restore a current year QuickBooks Fixed Asset Manager Client file: This option allows a Fixed Asset Manager Backup file to be restored. This is different than a QuickBooks Desktop backup file. A FAM backup is done within the FAM program (File > Backup).
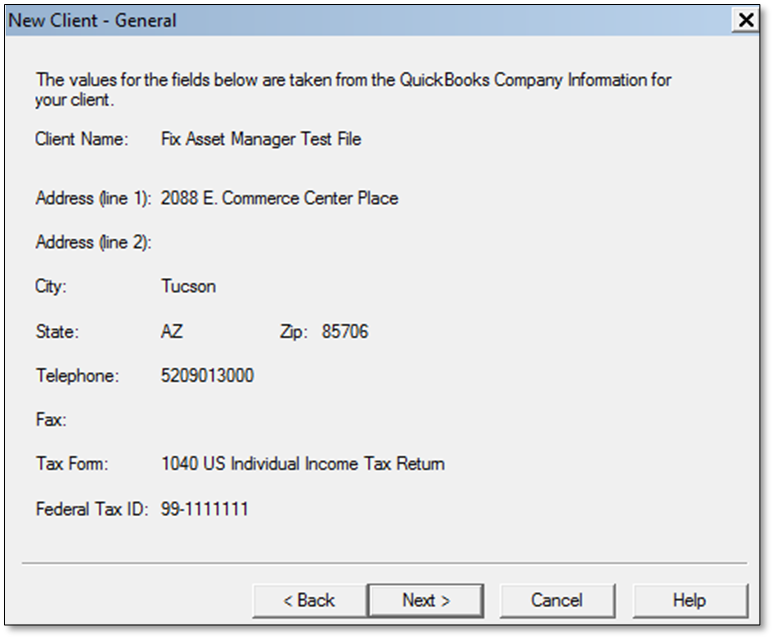
The Fixed Asset Manager (FAM) Client Wizard
- General: This is an overview of the company information from the QuickBooks Desktop file.
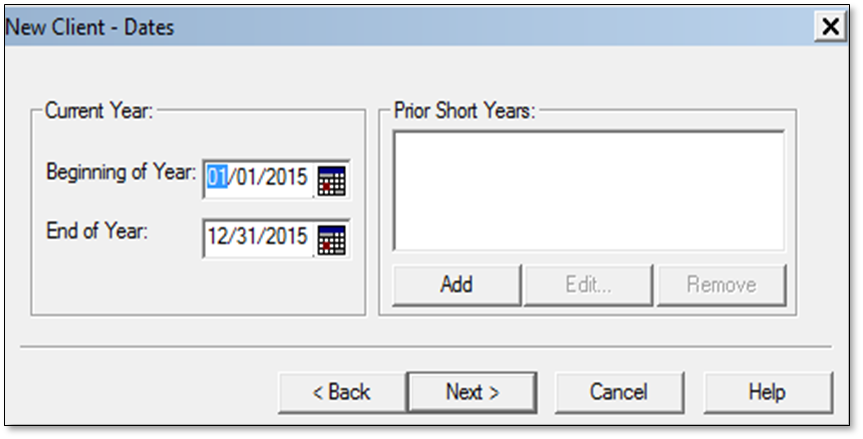
- Dates: Unlike QuickBooks Desktop, FAM calculations and reports are based on a defined period. Enter the Current Year beginning and ending dates for which the financial statements are being created. The program uses these dates to automatically compute prior year depreciation when an asset is entered into FAM. These values can be overridden with values from the client’s current depreciation schedules. At the end of this date period, users should follow the year-end procedures.
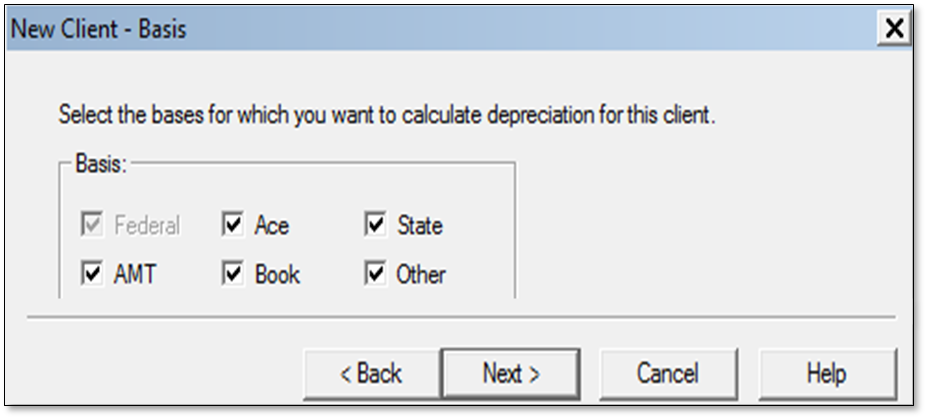
- Basis: This screen allows you to select which tabs show in the bottom half of the Asset screen.
- Methods: This screen allows you to select the default methods for newly created assets.
Note: Select the most often used settings for your own accounting practice to save time when entering new assets.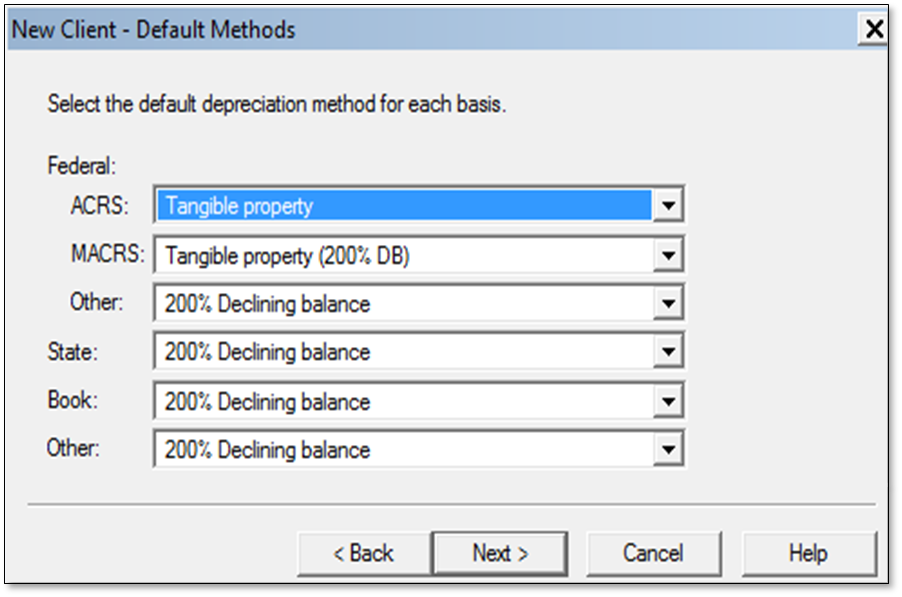
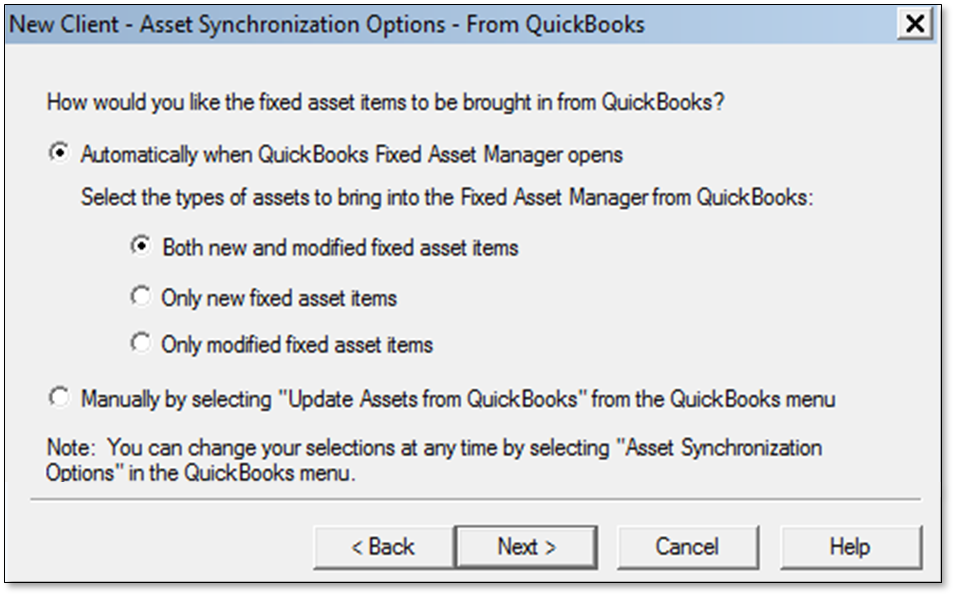
- Synchronization (From/To): This window allows you to control the movement of data between FAM and QuickBooks Desktop.
Step 4. Add Asset in Fixed Asset Manager
The steps described in this section is only applicable if you did not set up your fixed asset accounts in QuickBooks Desktop or if you prefer to transfer the information from FAM to QuickBooks Desktop. Information from your QuickBooks Desktop company file will automatically go to your FAM the first time you set it up. The two applications will continue to sync depending on the sync set up that you choose on your FAM.
- Add an asset to FAM:
- Select Add from the toolbar;
- Select F4 from your keyboard; or
- Select Add Asset from the Asset menu.
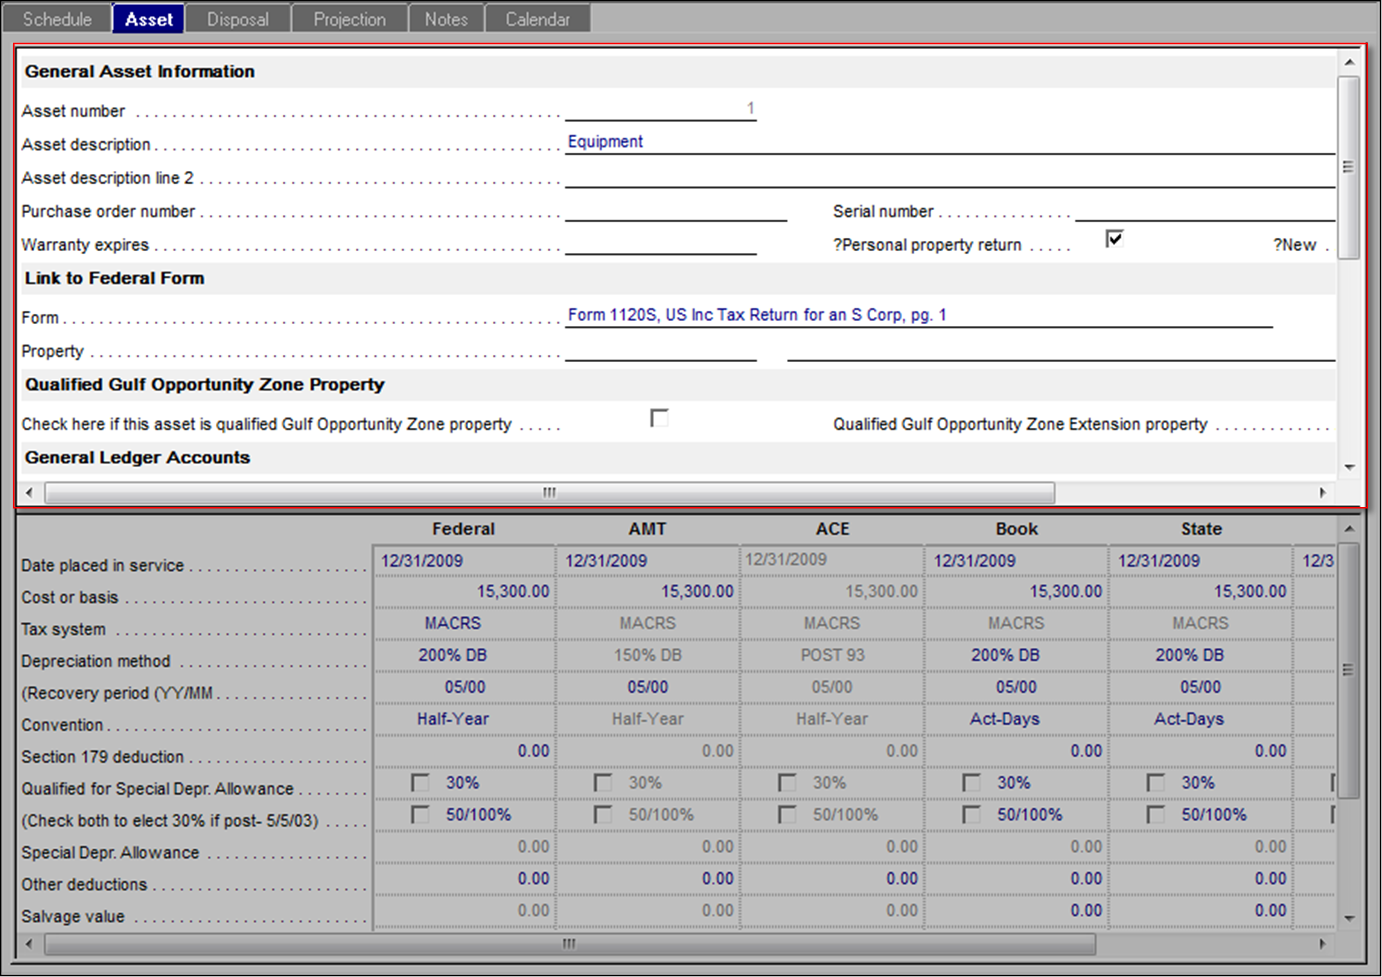
- Once the asset is added, use the top portion to add information such as description, federal form used to report depreciation, and general ledger accounts that were set up in QuickBooks Desktop.
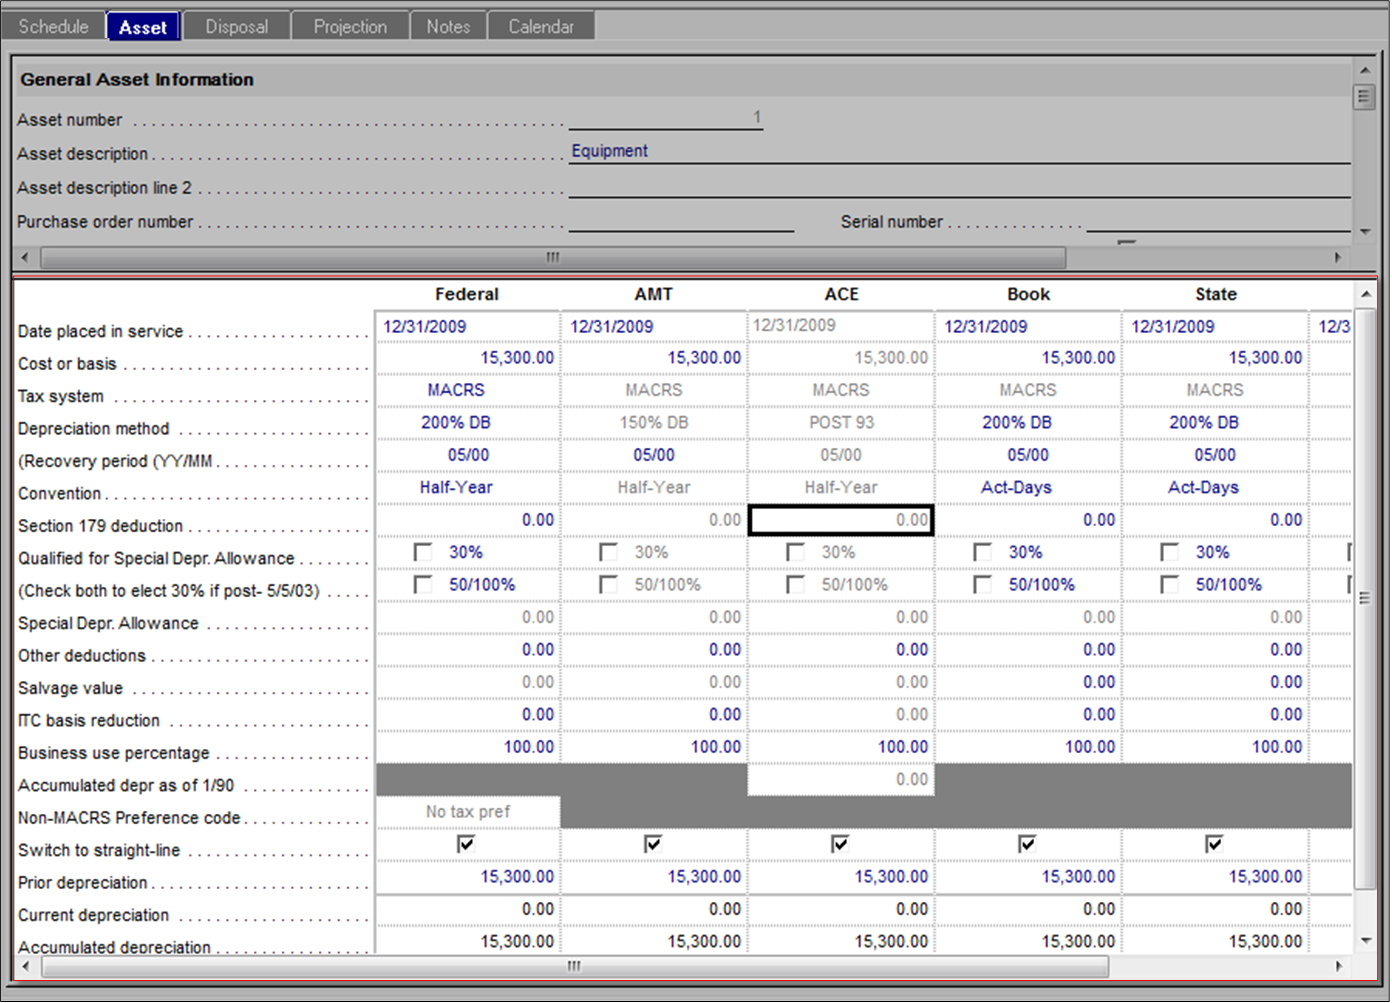
- Use the lower portion to add depreciation calculation information such as cost, tax system, and depreciation method.
Step 5. Asset Synchronization
<h3″>Types of Synchronization in FAM
QuickBooks Desktop and FAM have separate data files, however, the two programs can sync information with each other using either Automatic or Manual sync.
Automatic Synchronization
- From the FAM QuickBooks menu, select Asset Synchronization Options.
- On the From QuickBooks tab, select Automatically when QuickBooks Fixed Asset Manager opens and Both new and modified fixed asset items.
- Select OK and close Fixed Asset Manager to refresh the program.
Manual Synchronization
- From the FAM QuickBooks menu, select Asset Synchronization Options.
- On the From QuickBooks tab, select Manually by selecting “Update Assets from QuickBooks” in the QuickBooks menu.
- Under the To QuickBooks tab, select Manually by selecting “Save Assets to QuickBooks” from the QuickBooks menu.
- Select OK and close Fixed Asset Manager to refresh the program and make manual syncing available.
- Reopen Fixed Asset Manager.
- From the FAM QuickBooks menu, choose Update Assets from QuickBooks or Save Assets to QuickBooks to sync information.
Asset Synchronization: Sample Scenarios
- The small business owner enters an asset as a Fixed Asset list item when keying in a check. The accountant receives the company file backup from the small business owner and opens FAM. The asset will be imported into FAM enabling him to add depreciation details without having to enter all of the asset details again.
- The small business owner decides not to use the Fixed Asset item list. The accountant enters assets in FAM and exports assets to the item list. The small business owner will have a current e-copy of their fixed assets.
- The small business owner enters an asset in the Fixed Asset item list. The accountant imports the asset information into FAM, modifies it, and syncs it. Changes will then be readily available to the small business owner.
Roles each program plays in entering and tracking assets
QuickBooks Fixed Asset Manager (FAM)
- Asset information can be entered
- Depreciation can be calculated
- Journal entries can be initiated
- Various depreciation report/forms can be generated
QuickBooks Desktop
- Asset information can be entered
- You have the ability to generate customized reports based on what you need
Flow of information between QuickBooks and FAM
QuickBooks Desktop to Fixed Asset Manager
- Company Name
- Company Address
- Company phone numbers
- Income tax form used
- Federal Tax ID
- Chart of Account
- Detailed asset information
Fixed Asset Manager to QuickBooks Desktop
- Asset Number
- Detailed asset information
- Assets that have been added within Fixed Asset Manager
- Year-end accumulated depreciation
- Year-end book value

 บัญชีของฉัน